No products in the cart.
Install SSL Certificate
How to Install Symantec SSL Certificate?
Steps to install Symantec SSL Certificate on Plesk server
Initial Instruction
Before starting the Symantec SSL certificate installation, please verify the below checklist.
- Buy/renew Symantec SSL Certificate
- Generate CSR with SHA-2 algorithm
- Save the CSR & Private key file on your server directory
- Apply for SSL Certificate Issuance
- Submit SSL issuance Documents as per Symantec’s requirement
Step 1: Store Symantec SSL Certificate Files
After the SSL certificate issuance process, Symantec will provide you SSL via Email in a zip file. Download this zip file and extract the certificate files on your server directory.
You can download your certificate via Symantec Trust Center directly or via vendor’s account page from where you have purchase Symantec SSL Certificate.
Step 2: Rename Certificate File
Open the Server certificate file using a text editor (E.G Notepad), copy whole encrypted data starting from —–BEGIN CERTIFICATE—– to —–END CERTIFICATE—– and paste it into a new file. Now save this new file with Cert.crt name.
Note: Avoid using Microsoft Word to open the server certificate file, if may add some special characters which makes SSL Certificate invalid.
Step 3: SSL certificate Installation
- Open & Login into your Plesk account.
- Now move to the Websites & Domains tab section.
- Click the SSL Certificates URL
- Now hit the Manage link for the domain which you wish to secure with SSL certificate,
- Now click on Add SSL Certificate
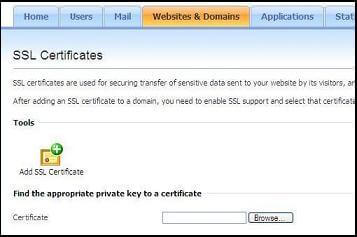
- Browse your Private Key, SSL Certificate and CA Certificate one by one respectively.
- Click over send file
- Now move to Websites & Domains tab section and click over Web Hosting Settings
- In the certificate menu select SSL Certificate then select the SSL Support checkbox & press OK.
Finally, Your Symantec SSL Certificate is now installed on the Plesk web server.